What you are seeing was not created by CAD, but by a commonly used 'gem-setting instrument'. This was created exclusively by a "Reciprocating Hammer-anvil" this is made for the sole purpose of making "creative patterns" (in the metal of your choice).
This hammer-anvil was honed to a fine point with the help of mini-grinding wheel (as shown below). The repeated 'hits' will make great changes to the surface of the metal from 'smooth' to a much desired 'textured' finish.

=========================================
The surface used here is a metal mold and many of the photos were made under 75power magnification. This photo shows the flat surface of any hammer anvil.

You can see the results from the many 'metal hits'. These hits were not superficial, but made exclusively to be used for the sole purpose of wax-injection.

Just make sure that there are NO SPACES in between any of the 'metal hits'.

If there are any remnants of metal without hits, please redo the exercise of 'hitting'.

The point of the anvil (shown further down) should be made DEEP.

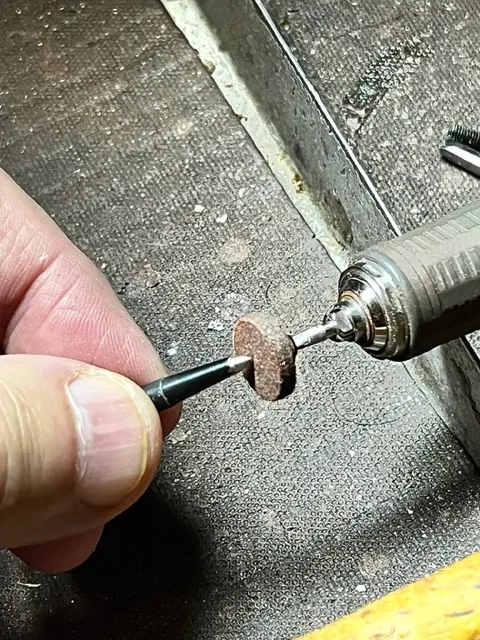
You really don't need a large cutting wheel for this small mini-shaping.

You can hold the anvil in your finger-tips, just as I am doing here.
.jpg)
I created a VERY FINE POINT to get in between the closely knit areas.

Here are other methods in making 'textured design indentations'.
Avoid using a Round Bur, here I'm using a #002 Round bur, with little success.

I'm using a larger Round bur, but with less success. How is that?
The larger Round bur will only give me a semi-flat 'hit'. This result is not conducive to the 'textured surface' that is required.
.jpg)
If you use your anvil is shaped for hammering, you can't achieve this decorative pattern that is then required.
.jpg)
If you choose to use your mini-round bur as shown here, the results are again, much to be desired. You will have to make numerous little 'hits', time wasting and such a laborious effort with poor results.
Each round bur using to make a 'pattern' being made here is not a good idea.
.jpg)
Please don't use a "bud bur" as shown, you won't get the required result as shown.
.jpg)
I'm now showing in this photo, the various 'hitting techniques' side by side.
.jpg)
In this photo are the 'bud-bur' shaped mini-patterns. Such a tiring exercise in making each 'hitting indentation'.
.jpg)

HOW DO YOU HOLD THE HAMMER-ANVIL?
This answer is so very important in making the design that you need.
1) Hold your Anvil in a perpendicular position. This will give you a (deep) hitting pattern. The 'hits' will be similar to little holes. This is what is required in achieving the desired and accurate 'textured effect'.

2) If you hold the Anvil on an angle, you can see the mediocre results. The 'hits' will look like little lines in the metal, do you want this to occur?

As of this writing, no on-line tutor has ever described this 'texturing process' using a Reciprocating Hammer Anvil. Why not?
gerrylewy18@gmail.com
No comments:
Post a Comment