In all of my essays about setting a square stone in "V" shaped claws? I thought of an idea and here is a 'scenario'.
A jeweller needs to set a Square "Princess-Cut stone today, but only has a 4-claw/prong head that was intended for a Round stone. Will he, or she say "Sorry, you have to wait until I create a ring for this stone". That scenario is now 'ancient history', I'm going to make your life easier by reading this essay along with many helpful (32) photos.
======================================
I have a series of square stones to use as samples; 5mm, 5.50mm 6:00mm and a large 7mm Princess stone. The ring 'sample' was designed for 6mm, but during this exercise, I'll decide which stone size is more suitable.
For a ring that was originally made for a Round stone, there are many further challenges in setting a Princess-Cut stone.
Here are the stones that I will be demonstrating with this 'sample' ring.
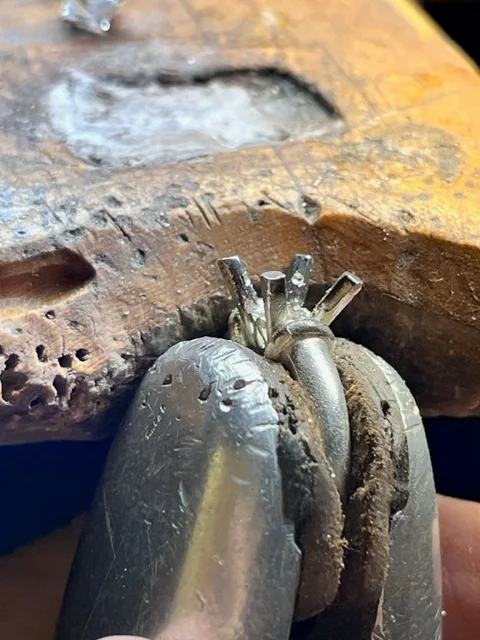
The very first thing I do is open the claws further apart, why is this? I need full & complete access for my burs to get into a small opening.
This 5.50mm stone is too small and so is the 5.50mm as well. The result is that the 4 claws must be completed with ALL being finished VERTICAL.
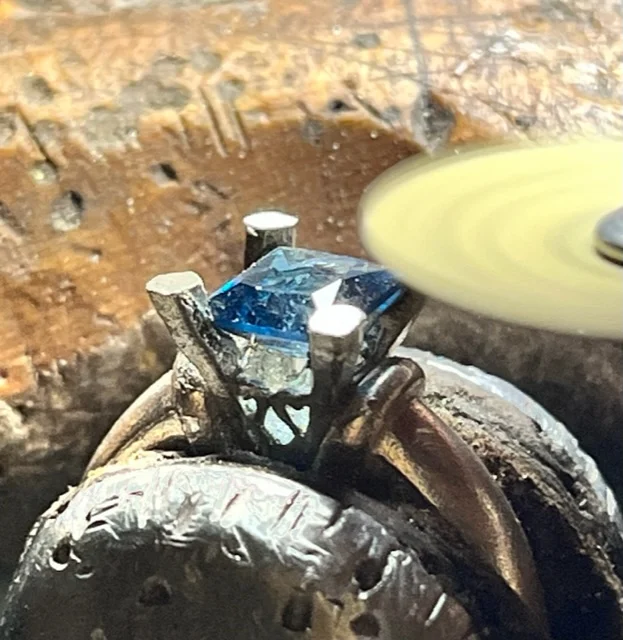
I chose a 6mm stone, as the ring was created just for this size. I like the blue colour as it will be easier to see during this 'colourful' and descriptive essay.
What size of round bur would I be using? Some stones either CZ or Diamonds come in widths that are never uniform. The easiest method is to lay your bur along the side at the widest Girdle thickness.
The 'optimum' width of the bur shown is the smallest of the two.
I feel more confident in using the 2 burs on the far left. I will use these smallest burs in another setting technique to be shown further in this essay.
THIS IS VERY IMPORTANT!
Look at the angle of my handpiece, as it's starting to drill into the claw. I want the stone to sit into the claw(s)!!!
You must be very sure that the 4 little holes are at the same height on all of the claws. If not, your stone will not be set correctly and will end up being crooked.
These two burs are of no use to you in this important drilling of holes. They are just too LARGE, if you use them, you'd be ruining the claws!!!
I would use a pair of dividers and make (darn) sure that these holes are equal in depth in all of the 4 claws.Just to repeat this rule, hold your handpiece steady, as these holes are too important to mess around with. I would use a slower speed on your bur for this important & initial drilling. DON'T SPEED as it will give you many problems.
WHY GO SLOW ON YOUR DRILLING? A faster rotating speed of your round bur will have your bur be slipping & cutting all around these delicate claws.
The next steps are to have your same small bur and make an 'oval cutting', why and what for? The simple answer is, this is where the Pavillion facets under the Girdle will be than resting against.
Understanding that every bur-carving has a definite and long-lasting purpose.
The second cutting is for the "Girdle" of the stone, this cutting should & can be extended outwards from the claw itself.
This 'wide bearing cut' is for BOTH 8 sides for the Girdle.
If you see that the downward corners of the stone are not deep enough into the claw, I'd ask you to recut DEEPER INTO THE CLAW...AGAIN...!!!
This is just what I'm writing about, I'm very pleased with how this is progressing and you?
For a trial, I suggest that you place your gemstone inside the head of the ring. This will give you an idea of just how evenly spaced your 4 claws are to the stone.
Make sure that the 4 claws are fully at the corners of the stone. With your pair of pliers, move each claw independently and examine this carefully, as I did for this photograph.
EACH CLAW MUST BE IN LINE WITH THE POINT OF THE 4 CORNERS OF THE STONE.
Again remember, THERE ARE NO SHORT-CUTS IN GEMSTONE SETTING.
THIS OVERALL DIFFICULTY SCALE is "25+, out of 10".
Make very sure that the corners of the stone sit into the 4 claws.
I am not bringing in both claws at once, "but only one claw at a time". One jaw will do the moving and the opposing plier jaw will do the supporting the 'moving claw' action.
The 'moving action' is only from above the Girdle, and not anywhere else.
The end result is that the point of the Square stone is being nestled into the claw.
DON'T PUSH THE CLAW TIPS TOWARD THE STONE, please use your pliers to do the individual '2 claw moving method'.
Remember all of the individual claw carving with the small round burs a few minutes ago? It's all been so worthwhile, all 4 claws are in line equally.
Rotate the ring and then examine in all of the 4 views, that the Culet of the stone is in the centre of the 'head'. Not to mention that there must be equal spacing of the claws.
You can see that all 4 claws are now touching the stone EVENLY at the Girdle-Facets and the Pavillion.
------------------------------------------------------------------------------ If you see that one claw is crooked, use your 'fine jaw' pliers and have that one claw moved backwards and you can now (carefully) reposition the stone.
Those 'deep claw' holes will now contain the four corners of the Square stone.
Your 'moving' is done ONLY at the top 25% of the claw tip.
From my perspective, only 3 claws are in complete alignment. The fourth claw at the 'top left' is not well-centred. Use your 10x power loupe and observe this problem.
(This step needs much practice for the beginner).
Use your 'Snap-on" Emery '240 grit' wheel and shave off much of the top of the claws until the claw tips are just ABOVE the Table of the stone.
If you use a course #1 or #2 grit file, you could be moving a claw out of alignment, also known as a WHOOPS! DON'T USE ANY TRIANGULAR FILES ANYWHERE. I suggest that you experiment with 'synthetic stones'.
"CLAW TIPS IN GREATER DETAIL @140x power magnification"
I honestly prefer to "File to Trim, the 4 claws". A simple rounding with a "77B Cup" bur of the claws is not for a Square stone, why not?
You, nor I should mix the two finishing touches, as a Princess stone is full of square angles and has NO rounded finishing.
I used (on these claw tips) a Triangular #4 grit file, which has a fine smooth texture when completed.
I use pumice wheels of #180 grit on both 'Tapered and Flat' surfaces to remove any striations caused by filing.
I attempted to have you see just where the Culet is located, it should be in the center of the 4 claws, no matter which view you have.
You can here see the softer filing that I used. I removed all of the outside corners leaving only a curved surface and no sharp angles, anywhere! The claw tips must never be higher than the "Table" of the stone.
I had my filing leave a flat front facet to the claw that was touching the stone. This will have the "claw tip" blend into the angles of the stone. Those broken corners are not broken, there were just remnants of water remaining after I cleaned the ring.
Rounding off of the corner claws DO NOT BLEND IN WITH THE ANGLES OF THE FACETS OF THE STONE. So why use rounded corners? aka. YUK!
In closing, I'll leave you with my personal tastes and you can make your own decision 'on any finishing touches'. I only wish that I could sit beside you and 'guide you further'.
I know that we all must experiment on our own and be educated on how to make this ring a "Wearable Piece of Art".
Sorry for my greatly detailed essay as there was so much to write.
gerrylewy18@gmail.com


No comments:
Post a Comment