I found these photos in my archives and think that it's best to show them again.
I'm not proficient in making videos, but being an avid photographer IS MY FORTE.
===============================
This one photo displays the 'before & after' example of the all-important 'grinding process'. In this photo are two Flat gravers with all of the essential description words on their sides.
In my previous essay, I explained what each word fully meant. Here they are again:
"HSS" refers to the tensile strength of the blade as 'High Speed Steel'.
"Glardon" is the company that manufactures the blade.
"N 10" refers to the base width or thickness of the blade.
"Swiss Made" denotes the name of the country of origin.
.jpg)
To start the grinding process, it is best to remove the back end of the graver. Some handles will accompany this extension, and the decision to keep or remove this piece of steel is up to your graver holder.
ALWAYS WEAR PROTECTIVE GLASSES AS THE SPARKS COULD HIT YOUR EYES OR FACE!!!
Cut it into the shape of a spear, I'd reduce the length to 1/2 of what it was when new.
.JPG)
To prevent any steel shards from getting lodged into the fingers, it is best to wear latex gloves at all times. I use them for safety reasons (and not for glamour.)
The brown tinge is where some overheating started. This must never happen near the front tip of the blade. This means that the HSS has begun to soften. Whoops!
Keep dunking the blade into a beaker of water to avoid this from happening.
.JPG)
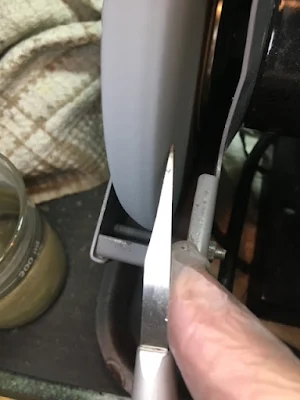
What I do is to gently contour the front of the blade as shown here.

Remove any 'sharp edges' anywhere on the blade. If not, your fingers might get sore from pressing on the sharp edge. (I know this from my own experience).

The length of the 'working blade' must never extend further than the first joint of the middle finger. This is shown and displayed in this photo.
.JPG)
This photo shows the optimum length of any Flat or even an Onglete graver.
.JPG)
Here is my beaker of water, always ready at a moment's notice. I'll never start my grinding without this beaker of cool water.

I might suggest leaving a little amount of water lying on the blade. NEVER ALLOW THE BLADE TO OVERHEAT!!!

With this photo, you can see just how close to the grinding wheel this beaker is situated.

After one or two touches of the rotating wheel, GET THAT BLADE INTO WATER...QUICKLY!

The design & shaping of your cutting blade is your decision. It's best not to leave the tip of the blade too thick, as sometimes seen in other instructors' blades.
.JPG)
Once the thickness of the new blade has been created. The next step is to smooth the sides of the blade to your own specification.

This is the most delicate step in grinding a (NEW) graver. Make sure that the fine tip never has the opportunity to quickly overheat.
.JPG)


.JPG)
.JPG)


.JPG)

This is the most delicate step in grinding a (NEW) graver. Make sure that the fine tip never has the opportunity to quickly overheat.

OVERHEATING OF A NEW BLADE IS THE ENEMY!!!
Keep little droplets of water always ON THE TIP of the blade.
.JPG)
This technique of simply grinding my gravers took me many long months of training during my apprenticeship years. This process is the basis of learning diamond setting.
.JPG)
To achieve and learn to grind the fine pointed tips of any graver is not measured in days or weeks. This actual learning process took me about 6-8+ MONTHS.
.JPG)
.JPG)
Just be darned careful how you maintain the high level of tensile strength at all times.
.JPG)
This is my bench grinder, and along with that, a very important beaker of water.
.JPG)
This photo shows the length of my thumb to the 'working length' of the Onglette graver.
.jpg)
For simpler calculations, the Onglette graver was measured at 23.19 mm.

This photo shows the 'before and after' lines before any starting of grinding.
.JPG)
.JPG)
.jpg)


This is an example of my collection of blades. In my collection, I have more than 15 blades of all lengths. Some are still in their handles, others are to be substituted in case of getting damaged.
.jpg)
.JPG)
No comments:
Post a Comment