Before you spend precious time preparing to cast your waxes, always be on the lookout for minor irritating errors that might occur.
These may look minor now, but after the metal casting, they could be a major 'repairing, or fixing' problem. It's better to fix them in these 'early wax stages'.
BTW, some of these wax-photo's may be out of sequence with the others photos. It's that I was joining two other 'unpublished, tutorial-essays' into this one essay.
===========================================
You can see that many of the holes are plugged or not fully opened. It's so much easier now in the wax, agree?

The corners need attending to as as the wax didn't flow evenly.

I keep the wax-temperature at a very low heat, I don't want to 'boil' the wax, only warm it.

In these watch-frames, accuracy is at 100% accuracy. I want 'the injected wax' to flow without stopping.

I'll even make the flowing hot wax to have a greater access to the watch-case.

As you can see that there is now 'ample access' to allow the wax to reach all areas.

These are my wax 'tools', The file is a very course instrument as it must be cleaned continually. This battery operated 'wax-pen' has two temperature settings, 'on & off'.

You can now see how much thicker the wax-gate is. I use a different colour as I really need to know where and how much wax is being applied.

This wax-file has only one purpose and that is to remove any unwanted wax from the item.


It's always necessary to weigh your waxes prior to your casting. You MUST know how much the waxes weigh as you, or the caster must know how much alloy and precious metal is required.

Keep your wax-file clean at all times, you need to 'remove' not add the previous wax-filing to your item.


These two cases show the newer drilling holes. Always drill THROUGH the wax, never leave it for later. It's so much easier at this stage during the wax-preparation.

Inspect all over the wax for any defects, it can and always happen. Keep your heating pen ready.

I never let the wax-pen actually touch the item, I let a drop of melted wax drip on to the item. If the wax-pen hits the item, the piece will get ruined.

This how and where that drop of wax resulted, afterwards you can file any residue.
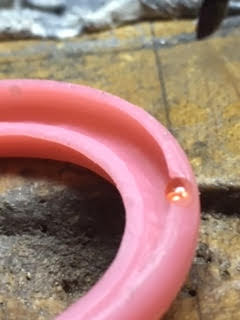
If that there is a little hole, I drill it further with my rotating 3-tooth knife and clean the hole for any dirt. Casting metal just hates 'dirt' during the flow of metal.

I'm just showing the 3-tooth drill, I drill to clean in either directions.

This 'cross-beam' is so essential for the flowing of hot metal during the casting process. If the beam is defective, so will be the flow of metal.

DIRT like this, is the enemy during casting, drill it away and fill it in with 'clean wax'.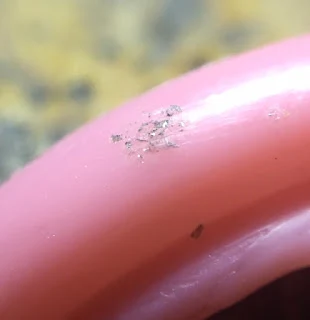

Never allow holes to be 'fixed' after casting, do it NOW. Always use a 'low heat' on your adjustable wax-pen.


Always add 'extra' wax to the casting-gate. Keep your 'warm fingers' off of your item as the finger-heat might distort the frame.


This is what the 3-tooth blade looks like. The 'lower blade' is a rotating knife that cleans a hole, while the 'upper blade' is very sharp removes any unwanted wax.


I increased the size of a hole that appeared to be a defect in the wax. You can do so much more in these wax stages.

The cross-beam is too thin for a good flow of metal, I'm going to 'fix' it in the photos later. The 'repaired' hole can be seen underneath.

I'll use my wax-file to clean any extra wax, THIS MUST BE DONE NOW!

To avoid any heat build-up, I'll use my latex gloves to prevent any bending of the wax.


I use a different coloured wax just to let me know 'where & how much' extra wax is being applied.

How do you clean the wax tip? This is an easy answer, just heat up the pen-tip RED HOT and let the wax residue burn off. Don't file it off yourself.


I applied a new and thicker cross-beam for additional wax to flow from one side to the other.

This is my wax-pen with it's own temperature gauge. The painted 'smiley' was painted by myself as the desired heat is at this point.

Can you see the missing piece of wax? This can be repaired just by adding a new piece of wax to it. Then afterwards 'heat and join' another piece to fill the gap.
.JPG)

The wax frame is too thin for setting any stone-setting, I just added more wax to allow my setting to take place,


WHAT IS THIS DEFECT? Get rid of it 'here & now'. Always examine your waxing for defects like these.

.jpg)
.JPG)
.JPG)
I always say, "if the wax is nearly transparent, then it's too thin for casting".

Many injection errors occur just at the 'gates', please be aware of this ongoing problem.

I sometimes allow the heat to warm the wax even when the heat is flowing without 'touching'.


I'd use my wax-file to 'gently' clean any spots, never after the casting in the metal.
.JPG)
Once again, the wax is too darned thin. Just don't even consider casting this piece of wax.
I hope that tutorial-essay was well worth your reading and I hope that you enjoyed this topic.
No comments:
Post a Comment