The most obvious instruments in my Diamond Setting bench are these two gravers. Where would we all be, if we never had to use them? There are times when we all must know and appreciate the technology behind the actual cutting process into the metal.
"Shall wonders ever cease?" We take so much for granted when we pick up this long blade of steel from our tool suppliers. When it is contoured into a shape that is easy to hold, we can cut it into Gold or Silver. (This tutorial essay is seen to be very repetitive, as they are all from my extensive 'photograph' library).
BTW, no "Computer Assisted Designing" has been used in this long essay.
What can these 'blades of steel' do for you? They can easily transform a basic metal plate into "Works of Wearable Art".
-------------------------------------------------------------------------
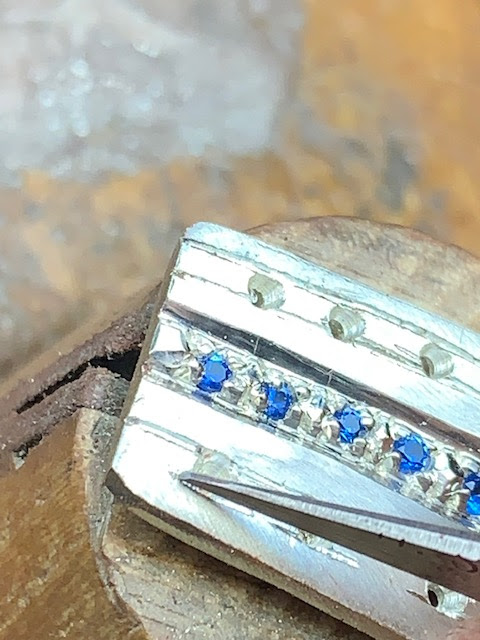
I will use this specialized cutting blade to Bright-Cut around the inside edge of a Full Bezel with a Pear-Shape, 5.25-carat Emerald. When this blade is contoured successfully, I wouldn't hesitate for a moment in using it.
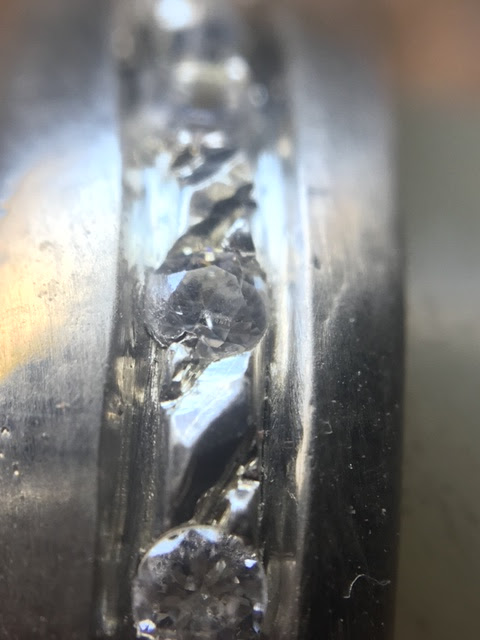
My client asked if I could set this expensive Emerald, and I obliged. He also told me that 2 other setters refused, as they were nervous about setting this $12,500.00 stone. My task was to as well clean up where the previous setter 'mishandled' his diamond setting.
==============================================
I have in this tutorial essay 140 photos of gravers with complete explanations, please sit back, learn & enjoy!
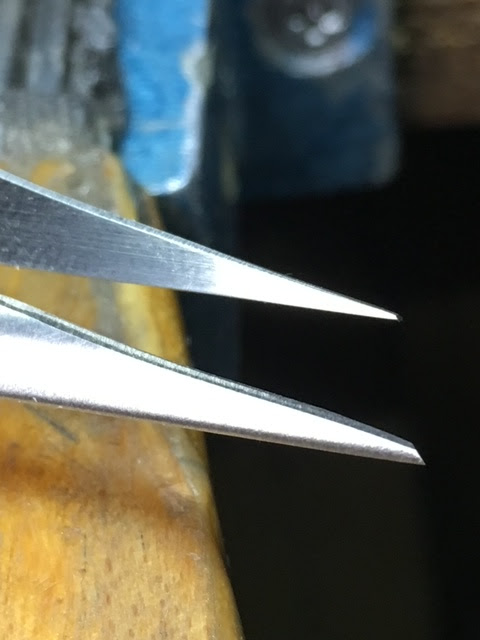
There are 3 (widths) or thicknesses of any Onglette graver. They are #39, #40 and the thicker #41. Each blade can and will be used for exceptional purposes.
To avoid any graver point breakage, I only ask you to buy a "High-Speed Steel" metal blade. The name of the blade manufacturers is of no serious consequence.
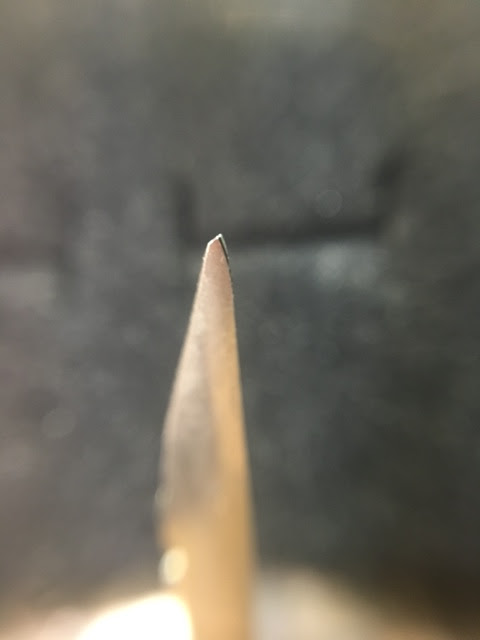
First of all, how do you hold this graver? It must be shaped to fit into the palm of your hand with the blade reaching the first joint of your middle finger.
Only an Onglette graver that is shaped for 'rough-cutting' will initiate such delicate metal cutting. I prefer to use a #1 thickness, to do this intricate sculpturing.
I use a 'rounded point' of my graver to manufacture beads of this size. I was taught about 60 years ago to make darn sure that the metal is COVERING THE GIRDLE OF THE STONE. Not against it, if the metal is covering parts of this stone, then the job of bead-raising is successful.
With the right setting tools, any stone can be set with no difficulty. BTW, all metal carving is done BEFORE any stone (Emerald) should be set.
With my Onglette Graver which is honed into shape will give more lustre to the metal. Don't rely upon casual filing after stone setting, I find this so irritating when this simple setting task is ignored. Why? Maybe the 'casual setter' hasn't had the expertise in finishing his task.
What are these metal shavings? These are the slivers of silver metal after I completed my Bright-Cutting process. The collection on the far right is from using my Flat graver.
Here is the close-up of Flat graver doing what it is supposed to do. It will give a reflected metal cutting, those 'lines' are not good. This shows me that the leading edge of the Flat blade IS NOT SHARP, whoops!
This is the same ring showing the Bright-Cutting, please do yourself a favour and use your Onglette graver on all circular Bezel settings.
It shows two things; 1) you care about your setting and 2) it looks so much cleaner.
I find that from my own experience all Bright-Cutting should be done with a thick Bezel frame as been shown.
These are the 'metal shavings' that I showed you a few photos before.
This is the correct hand-holding position prior to any graver control.
I like this photo, why? This is my "Bead-Raising" blade, that is modified on an Onglette #2. All of my blades are "H.S.S." aka "High-Speed Steel".
WOW, here is a very close-up view of my rounded front of the #2 thick Onglette.
Here is the same blade, but in a different view. Now you can easily see the gentle curve in the 'rounding effect'.
Two blades of the same thicknesses, one is for cutting and the other is solely for Bead-Raising.
Would you believe that the graver on the right, is my Flat graver? Why would anyone attempt to Bright-Cut by using a mountain of metal in metal carving?
Here are two gravers that I continually use, you can understand my reasoning for having two blades modified to be made thin in the front.
I will make every effort in controlling my hands & fingers during the bench-grinder-cutting processes. To avoid any heating of the blade, always keep a vial of water in close proximity. If the steel gets 'brown coloured', that means the steel is starting to lose the high tensile strength.
Please avoid any graver to be made thicker than what's shown.
This is the optimum length of the graver, against your fingers.
Whoops, there is a 'little browning' of the metal, this is directly caused by not dipping the blade into water often as needed.
KEEP THE GRAVER COOL to your touch at all times. It isn't ruined, but watch out during the shaping processes.
I use 'safety gloves' at all times just to keep my fingers free from any metal particles getting into the pores of my skin.
This ring was cast with no holes. Only my gravers both Onglette and Flat gravers did all of the great cutting.
You can observe the required angle of the graver in relationship to the silver plate, as it is starting to cut. This eventually will be a "Star" pattern. If the angle is deeper, so will the depth of the cutting. You are the judge in this matter.
Now honestly, how many diamond setters will Bright-Cut inside of the "V" claws? I gave a ring to my (assistant) setter, and all he did was file on top without my knowledge. It looked horrible and I had to Bright-Cut to repair it.
In this dice, I cut a circle around the hole. I had no intention of leaving it without any cutting, as shown here. Please don't use any Flat graver in this exercise only a "Right-Sided shaped, Onglette graver #3". Flat gravers will only give you faceting all around the opening.
The Bright-Cutting with an Onglette graver MUST BE DONE FIRST. If the cutting is done after setting, the front or point of the graver will touch the stone and damage the Girdle facets.
This is the correct way of holding any graver, no matter which hand you are using. Even to this day, I observe where the graver point is resting, nothing is left to guessing.
These are my gravers after I bought them. My task now is to shape them on my Bench-Grinder. All of them are "HSS" as the steel will be strong and not prone to breakage.
All of this graver cutting is done prior to setting any stone.
This IS MY VERSION OF FISH-TAIL CUTTING. Only two 'visible' beads are holding each stone.
I've pre-cut the circle in the dice, long before setting of the stone.
My "Right-Sided, Onglette graver" is cutting the metal. There is no possibility of using a Flat graver on a circle. If you do, you will have little facets all the way around the frame.
The lines along the cutting line is caused by a defective graver. Examine the cutting and quickly repair future cuttings.
I hold the graver at an estimated 45-degree angle. Don't expect to have a good cutting effect with this Onglette graver, it needs to repaired NOW.
Only a well-manicured graver will give you the desired bright and reflected surface. "Computer Aided Designing" just can't do this, it needs a highly modified graver point to make any setting look spectacular, agree?
All of this cutting is painstakingly difficult to the beginner, but after a few dozen pieces then everything will be so much easier. To repeat, DON'T USE A FLAT GRAVER ON ANY CURVES.
Those striations in the cutting line are because the graver polishing was not accurately completed. If you see 'any' lines STOP and re-polish the cutting edge before continuing. No cloth polishing will remove those mini-lines.
I suggest that you Bright-Cut the 'in-between the stones' areas before going to the outside long lines.
I keep my working area free of unnecessary tools as they might be a visual distraction while my eyes are concentrating on my setting. ALWAYS EXAMINE YOUR GRAVERS BEFORE STARTING ANY METAL CUTTING.
I painted the surface just for this exercise. In photography, I want you to see how my cutting is progressing.
You & I have two options either to use your Onglette OR your Flat graver. I again suggest other options for you, if you want a highly reflective surface then switch to your Flat graver to get a smooth surface. Faceting could & will start, try and experiment on your own.
This is only a 'practice, silver plate' to decide when to use an Onglette graver.
It isn't really important if the graver point isn't polished. You are only interested in the handling of the graver under different situations.
Experimenting IS important. Which graver shape and thickness of the graver, everything now is a learning period in your life.
When I was starting to apprentice (circa 1963) I had to 'experiment' continually.
-----------------------------------------------------------------------------------------
This is a good method in handling and controlling the graver.
This photo is just another view of the same area of cutting. This particular 'rough-cutting' is the basic attempt in starting your "Bright-Cutting".
I prefer to have a fine point on my graver to get into the more delicate areas. It's totally impossible if the front of the graver is thick & wide.
My graver point will work best when the face of the graver is maintained in this slim-looking appearance. On a 'scale of 10', this continual shaping demands an 8.
The face of this Onglette graver is slanted from a high right side to a lower left configuration. Hence the name "Right-Sided, Onglette #2".
Only the Right side is highly maintained on polishing papers, (this will be discussed in this essay shortly).
This is my HSS Flat graver. #0 equates to a very thin-cutting face.
I always like to keep my 'practice plates' clean for viewing at later dates. I abhor messy 'plates', as my reasoning is if my plates look in bad shape how can viewers like you appreciate my efforts.
Onglette #1 is a graver of my choice in this situation. All the beginning cutting will start here and now!
With the little square pattern, I will initiate a bright-cutting pattern. This is a "Difficulty of 10, out of 10"...OUCH!
The remaining triangles will be 'beads' in a few moments. I'm using only the finest and thinnest graver points.
I'm using only an Onglette #1 graver all through this exercise. Here are a few 'saved' slivers of metal after some intricate cutting.
Just be 100% careful when you are attempting to start your metal cutting with your Onglette #1.
Be so very gentle in your graver cutting, as each cut depends upon making an accurate pattern.
In using your Onglette #1, please take short graver cuts and don't be too aggressive.
If you have little control over using your graver, mistakes can & will occur. PRACTISING IS SO DARNED ESSENTIAL. While at your bench-grinder please keep a little jar of cool water within hands reach. YOU MUST KEEP THE STEEL COOL TO THE TOUCH.
I've used this rotating stone so often that it is now shaped to have an angle. This angle makes my graver shaping so much easier.
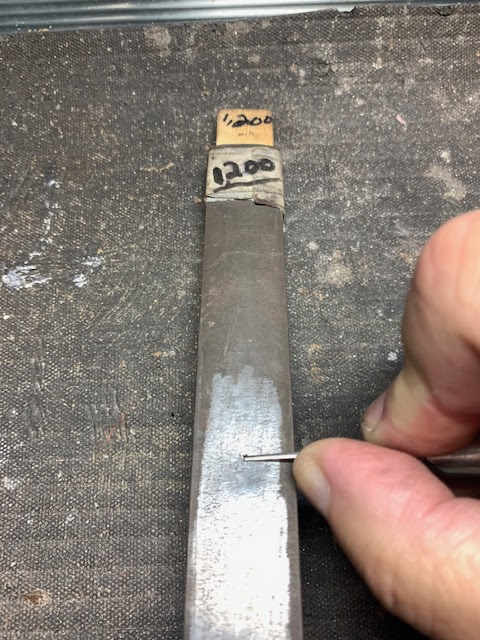
As I want a very smooth & highly polished surface of the blade, I'll be starting to use my 'polishing papers'. Number #1,200 is a first choice of paper.
I prefer to make my paper much smoother by rubbing a 'soft leaded pencil'. The pencil lead is rubbed into the pores of the paper, which in turn makes the paper grit much more smoother.
I'm using a #1,200 polishing paper on the Flat Graver. Paper number #800 is great and having a soft pencil lead being rubbed against this paper, it makes it like a #1,000 grit.
Only a fine graver face will give you the results you need.
Remember those little Squares and Triangles? Well, here are the results.
This exercise is not easy, accuracy is in the graver width of choosing, the shape of the face, and the thickness of the blade are a few quick decisions that must be made..before starting to put the graver into the metal.
No CAD can create this pattern, only YOU and your graver. I chose not to set one stone, why? I need you to see what the cutting looks like.
Another pattern without using "CAD". The setting of the ruby stones are the last thing to get worked on. The difficulty of this ornate pattern is 'beyond a 10' it's probably at a 25!
I was one of only 5 diamond setters where I worked who had the opportunity in creating these patterns in 'wedding bands'.
I used both of the two gravers that we're reading about. These stones are 1.75 mm in size.
This is a "Start-Setting". I used only an Onglette graver and a Bead-Raiser used in moving over the beads unto the stone. This difficulty is at a "15, out of 10".
This is named "Azure" many diamond setters used to engrave different patterns underneath EACH set diamond. I used only Onglettes #0, or #1.
Here is another variation based upon "Azure-cutting"
This what the Onglette graver looks like upon your buying trip. Below is the Bench-Grinder finishing.
Both of these are (again) "Before and After" views.
From a new Onglette graver I transformed this into a 'Bead-Raiser". The total Difficulty Scale is when the graver is ready for your setting & completed can be a staggering "30, out of 10". BTW, this process when I was learning, took me only 9 months of non-stop practicing during my apprenticeship years. (Circa 1960).
No matter the length of the used gravers, they are still useable as my (adjustable) graver handles can accommodate even the shortest blade.
Here are my collection of Flat gravers, below this photo are the millimeter widths of them all.
These are sizes of all of my gravers along with their designated graver numbers.
In this photo are my Onglette gravers. Mostly all are HSS, as these are my preference.
Do I have enough polishing papers? As one side of paper-stick gets worn, I just remove one folded layer and then I have another to use. Simple as that!
This is my 'holding angle' of my graver on my oil-stone.
Do you now see how the Flat graver is being polished? Without any care, the flat side will not be useable. You can see how I am literally pressing the FLAT face of the graver on to the paper.
This is my "Soft-core, Drafting Pencil #1". This is so soft that the pencil fills in the pores of the paper during this process. 'Seeing is now believing'. Please use a 'thumb-guard' at all times, as the underneath of the graver could very easily cut into your thumbs.
When your thumb-skin gets dirty, you very easily could get an infection, do you want this to happen? Don't take chances with your delicate skin, accidents do and will happen. (I know from experience). "OUCH!"
Only a fine Onglette #1 graver will suffice in this preliminary cutting.
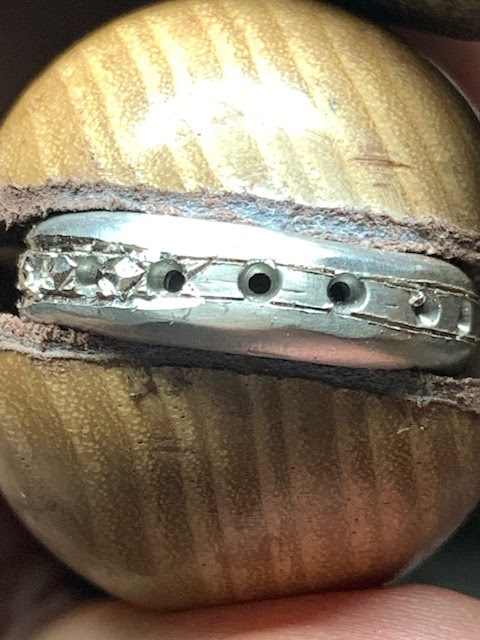
This faint line was for when I was getting my holes initially drilled. I'm using only a Flat #40 graver to cut a little square in between the stones. I am showing you only 3 sides being cut, this was only for demonstration purposes.
This decoration pattern is after 4 sides were cut. the next step was setting the stones. What happened here is that the metal was too thin and my graver dug in too deep. Remember, no CAD was ever used in any of my photo displays.
In this essay, I'm not delving into how to set stones, only how the gravers are being used.
All of these blades are Flat gravers of all widths. These have been well used in past projects.
Even if the blade is short in length, I can still use it, as my 'adjustable' handle will accommodate any length of graver.
The sole reason in having a 'wine coloured' handle, I keep only my Flat gravers in it, why should I keep searching for the shape?
The light-brown coloured handle(s) are used only for my Onglette blades.
While you are attempting to clean your graver, hold it firmly in your hand and create a smooth surface.
Buff smooth on one side, than the other. After this rubbing, the graver will be just a great cutting tool to work with.
This is the correct size of the graver edge. Look at the shape of the point as well, it looks like a triangle.
When you are doing the 'rubbing' into the pores of the paper PLEASE DON'T RUIN THE PAPERS' SURFACE.
Make note of the written information of the soft pencil, it's for you to keep on hand.
There is a slight (brown) discolouration on the tip of the graver, no need to worry about this as the graver is still a fine blade to work with. The water was not used too often to cool the graver and it started to heat up. WOOPS !
I prefer a '2, screw' graver handle, why? If one screw gets ruined after being tightened often, it could get worn down. There is always another screw to hold the blade tightly.
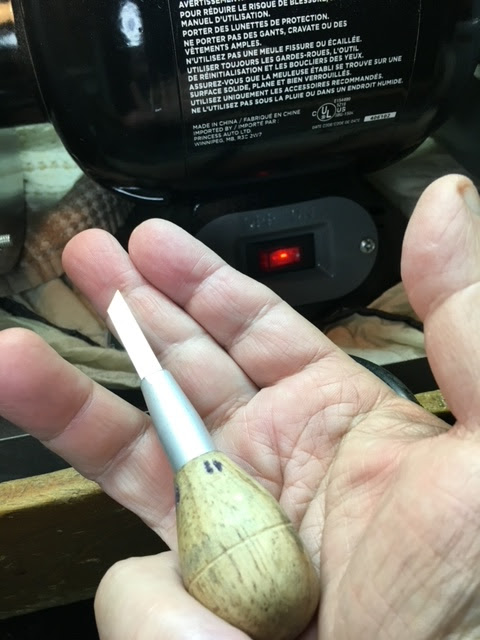
I'm removing the back end of the graver as it isn't needed, once it gets into the wooden handle.
This is the envelope that my Onglette graver came in, this information is totally for you to look for.
I saw this pendant in a 'high-end' jewellery store in a nearby mall and thought of this essay for OUR blog. This is done with only a selection of round Pave' diamonds.
As you can see that there is some mixtures of colours of diamonds. I suppose that the owner wanted to keep the selling price as low as possible.
I made this pattern when I was only 20 years old and that was 60 years ago. My son-in-law now wears it 'proudly'.
I saw the following photos on a shopping mall billboard in an 'upscale' mall. I took photos of the Diamond Setting. For your information, all of the stone setting was done before the Bright-Cutting.
You can even see a faint line of remaining metal around the stones. This is not appropriate in this style of expensive watch, agree with me?
Even while setting a Pear-Shaped stone, I will use my Onglette graver to Bright-Cut around this Cubic Zirconia stone.
As this was only a white sapphire I will still use my Onglette graver to Bright-Cut around this Half-Bezel stone.
Gypsy-Setting a Pear-shaped Amethyst is a difficult process. The Difficulty Scale for this is about 25 out of 10. The chances of breakage is insanely high. There is faceting around the stone from the closeness of the metal to the stone.
When I saw this ring at my casters' display I just loved it, why? I can have three kinds of settings done in one ring. They are 'preliminary rough-cut, Bright-Cutting and lastly the finished setting of the stones. The original ring had only 3 bars of metal and my gravers did the completed style along with Milgrain.
There was no CAD created cutting done in this "Fish-Tail" pattern exercise, I found this to be an interesting pattern. You see other similar CAD creations, but having this 'done by hand' is more of my style of Diamond Setting.
How would you clean up the Princess-cut stones after setting? One answer, use your Flat graver, don't even think of a Triangular file as it will leave serrated lines along the channel setting. I left all of the stone setting until all of the metal cutting was completed. All that will be remaining are the little squares along with the stones. The squares are just an ornamental design.
This is the "Star-Setting" that I showed you before, now is the time to rouge polish the ring prior to any stone setting. (This was a flat-top ring when I received it from my caster.)


.JPG)


.jpg)


.JPG)


.jpg)


.jpg)


.jpg)
.jpg)
.jpg)
.jpg)


.jpg)


.jpg)
.jpg)
.jpg)
.jpg)
.jpg)
.jpg)
.jpg)
.jpg)
.jpg)
.jpg)
.jpg)


.jpg)


.jpg)


.jpg)


No comments:
Post a Comment