This exercise will 'blow you away' with its simplicity. All I used are my regular Onglette #0, #1, #2, and of course, my well-used Flat Graver #40.
Be prepared as there are literally hundreds of photos to be examined here. Here are 275 photos taken from my iPhone covering a span of 3 years. Included are a series of 'up-close' photos on "Bright-Cutting" showing as well how to create claws from a flat metal plate
Please understand that there wasn't any CAD (Computer Aided Designing) involved in any of this intricate cutting. I was taught this "simple exercise" about 25 years ago, now you, my readers will be the 'second or third generation' in seeing how this is done with only a few gravers'.
===============================================
This photo will fully explain why a Flat graver is so important in Bright-Cutting. It gives a wonderful sheen that no other bench tool can give you.
The first thing I prepare is WHERE will the holes should be drilled. I 'mentally plan' every step and keep the twist drill to be held vertically.
I try to avoid any vise-clamping devices as the clamps usually interfere with my fingers. I feel more comfortable using the shellac stick, why? My fingers can get right to the area where I'm holding my gravers, just MY TASTE.
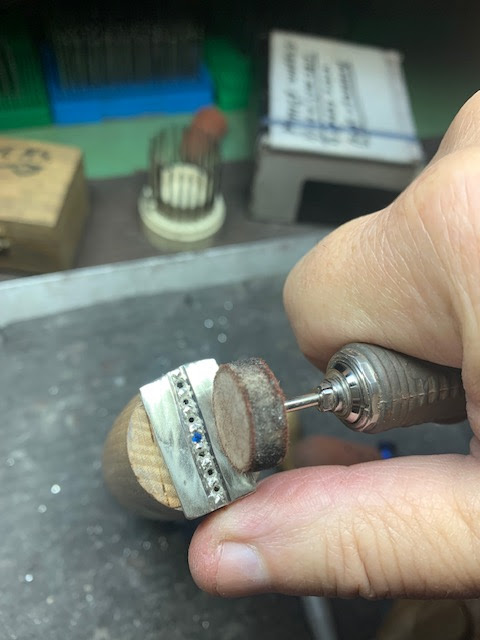
This is EXACTLY what we are aiming for; a Milgrain edge, Bright-Cut line, 4 bead-claws per stone, and a deep separation of the metal in between the new mini-claws.A "shallow separation" of the "O+O" will give me a small height of claws, thus not allowing me any future movement to hold the stone.
This is the bench-top layout of my "photo studio". It looks mediocre & unusual, but the results are G-R-E-A-T.
These "Before and After" views are just what we are aiming for.
I always "ink" my plate spots before any cutting is to start. As when I start the "rough-cutting", the bright bench lights won't give me any eye strain.
With the Onglette #1 graver (and nothing wider) start to cut along the inked line. Get that graver to cut right INTO THE EDGE OF THE HOLE.
From the holes, using a "narrow or small sized, bud bur" another lateral line (as shown). This new cut line MUST BE DEEP, as depth is 100% important.
As shown in this photo, you may use a similar bud-bur and cut another line from one side to the other 'rough-cut' line. Again, please CUT THIS NEW LINE DEEP. Now you should have a configuration of a 'cross-shaped' pattern inside of the two stones. If you need to dig deeper, so be it. Don't use a wider bur (of any shape) if you do, you will be reducing the width of the new beads/claws.
I'm now using a round bur to gently cut deeper in between the new claws. The deeper you go, the more height you will have in making stronger claws. Simple as that!
These are the 'shapes and sizes' of the small burs we will be using. I will be using ONLY the 0.51 & 0.55 mm's.
Don't be too concerned about the first encounter with your Onglette #1, this is only seen as a very rough cut. It's only acting as a guide, nothing else. With your Onglette graver #1 start to correct any errors in your cutting.
There are some things to remember:
1) keep your graver perpendicular and don't 'lean it on an angle' while cutting. My teacher taught me this one simple rule 60 years ago and it's worth remembering.
2) keep your 'revised cutting' line deep and DON'T LET THE GRAVER TOUCH THOSE MINI-CLAWS.
3) If you wish to insure that this line is deep enough for you, you could use a bud-bur and gently recut where your graver touched.
You now have mini-claws, where there weren't any before. If you need to Milgrain the border lines, kindly do so NOW.
All you need to do now is to lightly polish your setting areas. YOU ARE NOW DONE!
If there are some lines to be Bright-Cut again, do this now. Once your stones are set, forget this re-cutting operation. Once the stones are in, "game over" it's just too late.
If you need to use your graver to recut once any stone is set, your graver will quickly damage and ruin that stone.
Your Flat #40 graver, is the only tool you need to give you a clean and shiny surface. From a flat piece of rough-looking silver metal, we've created mini-claws.
With these newer claws, you and I can now set the stones of your choice, even a soft Emerald.
We are now going to do a FULL revision (including more photos) of this interesting exercise, are you READY? Then just sit back and learn.
=================================================
With your "inked" spots you can use a small round bur an make an indentation for your twist drill. If you don't do this single maneuver, your twist drill will be skimming all over the flat plate, YUK!
Start your drilling at the vertical position right through the plate. OIL THE DRILLING AS OFTEN AS YOU CAN, why? Your twist drill will overheat and get stuck in the soft metal then cause you much stress as it binds and gets broken.
But what happens if the twist drill won't move, what can you do? Very carefully release the twist-drill from your hand-piece and slowly rotate the drill out of the plate using a pair of pliers.
Before you drill any holes, scribe a line on the plate before you start your drilling. (You need this as a guide).
Along that "scribed" line, you should & MUST use a small bud-shaped bur to create a 'separation between the holes'. Those three lines on the edges will be more Bright-Cut areas to work with. These will be shown in a few photos
These small burs are the sizes that will be used extensively.
For your assurance in making stronger claws, I really suggest digging deeper with the 'round & bud shaped' burs.
I implore you to keep this 'line of cutting' straight and not have it crooked.
In this photo, the new space for these claws is not deep enough. Get the '+' cutting pattern much deeper. These look as if there isn't any opportunity in pushing over any "claw" metal.
Get rid of any of the metal around the holes, do this as soon as possible, not when the stones are set. Then it's too late!
In this photo, you MUST STILL DIG DEEPER than being shown here.
On the lower line of mini-claws, I'd use a "bud-bur" and get rid of the metal around the holes. Do this now before you start another 'line-cutting' process again.
Here you can see the first of the "Bright-Cutting" processes being started.
The "Bright-Cutting" is now like a mirror on both sides of the new claws. AMAZING RESULTS?
These two mirrors are shining as the "Hubble & JWST" space telescopes. In this previously shown photo, don't forget to keep those "Cross-Cut" patterns DEEPER than shown here.
Don't leave these lines crooked like these two are! How can you fix them, this is very easy. I'd use my bud-shaped bur and let the long-cutting bur create a long-cutting line, not like what is shown here! The indentations for the twist-drilling, are too close to the already drilled holes. Sorry, but this was my mediocre planning!
The little scratches in the Bright-Cutting are caused by a Flat graver that hasn't been adequately polished. Beware, that little mistakes like these can have 'ripple effects' in your Bright-Cutting afterward. This photo has the same problems, I'd redo the graver polishing as soon as possible.
These are my inventory of gravers that can be used in this exercise. It's not the length, but what the graver point can do while in the 'extended handle'.
The extended handles are just GREAT, as any graver length can be used with equal chances of doing their work.
I'm using my Onglette #1, #2, and sometimes #3. These are my favourite Flat Gravers #40, if one gets worn down, I'd switch it with another at a moment's notice. I'd leave the bench-grinding for another time after my setting has been completed.
Always keep your cutting lines 'straight' and keep those same lines DEEP. Get rid of those edges of metal that can be seen here. They have no place in this project, or anywhere.
I'm so happy with this photograph. But one thing is that the plate depth is rather thin to set any stones. I'd use this as a 'demo plate' only.
The cross-pattern is still not deep enough, but you can see the "Milgrain" design being used.
I can't pass judgment on this cutting as there isn't anything worth discussing. Also known as SCRAP.
All of the holes should be drilled with a bud bur, why? This is for the Pavilions of the stone, as each stone IS TAPERED. The cutting is what is required, but not to be used.You can see the "Before & After" views of the gravers. Under normal circumstances, a graver blade will last for ONE YEAR (or even more).
This graver #0 is thin for one purpose, I need this to get in between small areas.
WOOPS! THIS LINE OF CUTTING IS CROOKED and this could cause you unsurmountable problems.
The holes on the 'left side' are too darned close to the center line. The holes on the right are just good to continue.
These three lines are too wide and I won't be able to fix them. Its only good for one thing and that is to be 'scrapped'.
This is my favourite pattern, it's named "Star-Setting". Again there was no CAD involved in any of my metal cuttings.
Here is another example of "Pre-Cutting" then followed by "Bright-Cutting".
I'd be very careful in this setting, as the metal is quite thin. I wouldn't use it and only have it as a 'demo-setting' plate. The milgrain pattern has a nice long-lasting effect.
Without a Milgrain edge, the metal looks nice. But with this Milgrain-effect it looks just FANTASTIC. I use this "156C, Under-Cutting (aka) Bearing-Cutter" bur to prepare a seat for setting a smaller stone. This can be used only in extreme situations.
Here are a full set of bead-burnishers that are used solely for pushing or moving over a mini-claw.
In this photo is the generic SQU name if you need to purchase these bead burnishers from your suppliers.
In using a wedding ring, the previous examples of cutting can be used anywhere a flat surface is being displayed.
I can make a little square look just like a 'simulated diamond'. It all relates to what your gravers can achieve, of course, your creativity as well.
I'm showing you how the three sides of the square pattern look. 
Here are three of the four sides of the center square design. Where does the Flat graver start to cut?
The very first cut is at the "long line" and terminates into the empty hole. Thus avoiding any danger of ruining the deep line being prepared for Bright-Cutting.
The 'scribed' line seen here is where I usually clean the scribed top with the Flat graver. Afterward, I'd use my Pumice wheel of #1,000 grit (Pink colour) to keep all spots clean, with no marks.
The Bright-Cutting effect starts at the line-cutting and finishes inside the hole. This way there is no danger of ruining the 'rough-cutting' line.
If the center meta pattern is too long & wide, I'd create another square pattern side-by-side.
The Emerald stone got damaged and out it must come! "Goodbye & good riddance"!
Now you see why ALL STONES MUST BE SET AFTER ANY GRAVER CUTTING.
This is my Bead-Burnisher showing the 'flange'. As this flange rests against the stone, the stone won't get damaged. Only 3/4's of the burnishing tool covers the stone, thus saving the stone from being touched and ruining the fragile stone
Compare the untouched graver blade and a graver that is being now used.
For your information, this process of grinding a graver blade took me about 1 year in my 9 years of apprenticeship.
I can set an Emerald with no problem if all of the Bright-Cutting is initiated before the stone setting.
Here is my reasoning for Bead-Burnishing with the 3/4 beading tool not touching all of the stone. BTW, this name the 2-beading design is called "French Beading". All of the Bright-Cutting is done prior to the actual stone setting. This ring was cast for my display tray as a ring top with no holes drilled. Again, no CAD was used.
Even on a gentle curve, I can still cut a straight line, but all of the settings was done AFTER any cutting was done. Milgrain was an option, but not used here. I chose to insert multiple beads instead of little squares. In this CAD-created pattern, I used a bead-burnisher to handle the 'pushing over the stone' applications.
This is the process using a diagram, of how the bead-burnisher actually works.
Only an Onglette graver can create these fragile cuts.
These appear under diamonds, the name for this is "Azure" 
This is my ring that has 3 sections in it, as this is for display purposes only. I used it nicely for this essay.
This style of setting is named "Star-Setting", the engraving was done prior to any gemstone setting. I left one stone empty on purpose for your perusal.
Which of these FLAT-graver-cuttings is a stone? (answer) NONE OF THEM! You can see where I faceted the top of the center of the square. All you see are little facets on the metal surface imitating a genuine stone. Interesting graver usage?
The left line is just a 'mediocre' attempt at bright-cutting. The line on the right is a "WOW" there is even a reflective surface surrounding the claws that was just engraved.From a completely flat surface that was just a ring with no holes. This is still in my demo container for display purposes,
There is only one word for this demo plate. SCRAP!
If you want me to explain my reasoning for using the word "scrap" scroll further down is the long list.
After all of the Bright-Cutting was done, I set the stone.
The Milgrain effect does nice things to the overall finished setting.
The claws are not well made, but they are still useable. There is no claw seen here to bend over any stone. The Bright-Cut is fine, but the rest needs to be worked on further. I'm using an Emery paper to round off the point of the graver. If I don't do this, the graver point will be broken as I attempt to push over any mini-claws.
I'm rotating the graver point to take off the sharp edge from the tip of the graver.
I'm using a very soft Polishing paper of #1,200 grit. This soft paper will polish the steel off of the Flat graver.
I applied a soft-core drafting pencil to give my graver a mirror finish. The pencil lead will remain in the pores of the paper thus giving the graver a long-lasting Bright-Cutting effect.
Why have your graver point been like "a mountain of steel", I can now cut a line in the metal with so much more ease.
When you are using a bench grinder, don't let the graver get too hot. Keep a little container of water nearby at all times. Heat will soften the HSS and not be useable. You then must re-temper the graver steel again.
You can see the graver tip getting RED-HOT and not good for even short periods of time.
"Problems galore, let me count the ways". For your information, I've created this series of errors and mistakes on purpose. "Do as I say, but don't do as I did".
= = = = = = = = = = = = = = = = = = = = = = = = = = = = =
1) The line-cutting at the end, was not aiming at the edge but hooking inward.
2) There is still an amount of metal at the edge of the hole.
3) Can this be saved? Just barely, even I would have difficulty with this.
4) This again is just barely acceptable, why so? The two lines aren't connecting. 5) The lower line cutting will not match the end-top stone. SCRAP!
6) What happened here is an unknown factor. The lower line of cutting is too much inside of the hole. The top line went off on a tangent, another SCRAP!
7) "Your guess is good as mine". Just another piece of silver for the "recycling to the SCRAP refiner".
8) This metal was too thin and the drilling of the holes went through without any hesitation. SCRAP!
9) These holes are not in a line. The only solution is to use bigger stones on the left side. I can still correct the lineup, just being careful with using a bud-shaped bur. 10) When correcting the drilling, you can lean the bud bur on an angle. You can't do this with a round bur, it's just not possible.
12) These holes are 'all over the place'. Where was that line marking, I wrote about before?
13) The line-cutting is not uniform in its depth. 14) The hole shown on the far left is also not in line.
15) I can't salvage this, guess where this will end up?
16) This is now looking better, as the line is almost straight. I can see a tendency for the cutting to be moving away from the third hole from the left.
17) The graver point is going in the right direction.
18) This is what I wanted to see, why? The two lines are 100% parallel to each other. The graver must be kept against the edge of the hole at all times.
This "flaring of metal" is what every rough-cutting process looks like under a microscope.
I'm using a bud-shaped bur to remove any residual amounts of metal at the first opportunity that I have. I can't do this when the stone is in.
Can you see my face when I envisioned the finished product?
I would like to remove all of these gentle marks NOW. Please scroll down further, as you can see how this is accomplished.
This is the only method in cleaning the surface of the metal
I can utilize any size of stones in these plates.
I use this method of first cutting these lines, then only then joining them together. This could be a good solution for you in 'rough-cutting' lines together.
This is my best initial Onglette graver #0, this is my work-horse in 'rough-cutting'. Some of my Onglette angles are created to cut only on one side. This is named a "Right-Sided Graver". The 'right side' uses Polishing Paper #800 as well as #1,200 grit smoothed.
Only a thin pointed graver can give you greater access in cutting in the metal.
Now imagine if this was a 'large and bulky' looking graver, none of this highly detailed cutting could get accomplished, trust me!
Here are two views of the same process. You can easily see the flange of metal being cut from the plate. The cutting goes right into the edge of the hole, this is where it is supposed to be. Texting is nice, but photos of the same are even BETTER.
You can see the tapered hole for the Pavillion of the stone. Don't forget that these minor details are SO IMPORTANT.
When I'm attempting to capture this "metal flange" I'm doing this for a reason. It greatly assists you in understanding the 'what, where & why' we are doing this preliminary cutting.
If the space between any two stones is too great, don't worry this can be resolved. The answer is to engrave two little squares and then 'Bright-Cut' these squares.
Be inventive and resourceful in using your gravers.
GRAVERS ARE YOUR TRUE FRIENDS, LOOK AFTER THEM & THEY WILL GIVE LOADS OF GOOD DESIGNS.
This is just what an "Onglette #0" line of cutting looks like under great magnification.
If you missed other photos of 'rough-cutting' this is a great opportunity in seeing these again. We take so much for granted when 'we' are doing our fine-quality of stone setting, agree? I like to Milgrain often as this gives me the chance of showing where each line of 'stone setting' terminates.
FYI, if the plate is not accurate in its design, then your line of cutting MUST ignore that fact. YOU ARE A DESIGNER AS WELL. With each new line that you cut, I am learning, as well as you to improve on what is needed.
I will Milgrain both edges and try to avoid any errors in the making of the plate.
Keep your graver sharp at all times, and keep your 'oils-stone' well oiled. Never assume that your graver will stay sharp, IT WON'T. I will resharpen the point after 3 times of cutting. This line of cutting is not straight. OUCH! Both of the three lines are all over the place. After a few weeks of cutting with your fine-quality graver, this will exercise will become almost 'second nature' to you.
OH, the Bright-Cutting is shown here with a clean & well-designed FLAT graver.
It's good practice to experiment with your FLAT graver just to see how it's working. Using your 10-15x power Loupe to closely examine everything that you are cutting.THIS "SECOND REVIEW" IS TO FAMILIARIZE YOUR NEW FACTS.
For practice cuttings, its better to have a THICK plate.
Have your inked metal in a straight line, as this is your ongoing guide. Now again, keep this line straight and not to let your graver get crooked.
Keep your holes in the same size and above all, well spaced. Please don't let your ending of the cuts taper off from towards the end of the plate. When you are drilling holes, make allowances for the Pavillion of the stone.
"Coloured inking" prevents a distraction for your eyes. Bright surfaces are hard on them as well.
Cut your little squares, starting at the cutting line and ending IN THE HOLES.
Recut your lines DEEP, doing this process 2-3 times, each time a bit deeper.
Clean out the holes from any metal residue. Once this done you can "Bright-Cut".Use your bud-bur and remove the extra metal along the rough-cutting line.
Once your Bright-Cutting squares have been completed. Cut your rough-cutting lines again with your Onglette #2 "highly polished" graver.
Don't hesitate any longer, you can now start your "Bright-Cutting" with all your vigour. Examine your FLAT graver to see if the front cutting edge is free from any defects.Don't destroy those "little triangles" as they will be beads after a short while.
The bright shards of metal mean just one thing that your gravers are absolutely sharp and clean.
The little squares are there for one purpose. They fill in the gaps in between the stones they also have an appearance of additionaal stones, nice?I say that my brightly shining metal is brighter than the actual diamonds.
The 'rough-cutting' graver has dual purposes, it separates the two new lines of stones. If your graver has a polished graver edge, then this line will shine so much nicer.
This is how the separating line looks in between the lines.
Don't let the end of the cutting line meander off on an angle.
The new and existing outside line must be 100% straight.
Just another view of a 'notso' straight outside lines.
At every opportunity use your Bright-Cutting gravers.
You can now see that all of the beads are in one row.
The bright-cut line on the right is slightly crooked. Please avoid this error.
I sometimes use "nail polish" as a colouring agent. 
Lets experiment with this plate by creating something different. We are still using 'triangular shapes' that will be beads.
The RED nail-polish allows the eyes to see the patterns better.
I had some gold-coloured ink and let it be used as a gold colouring agent.
I sincerely hope that you and your friends learned a few interesting facts on "Making Claws & Beads from a Flat plate".
This was my most detailed tutorial essay since I started writing this blog on gemstone setting 6 years ago.

.jpg)
.jpg)
.jpg)


.jpg)
.jpg)
.jpg)


.jpg)


.jpg)


.jpg)


.jpg)

.jpg)
.jpg)
.jpg)
.jpg)

.jpg)
.jpg)
.jpg)
.jpg)
.jpg)
.jpg)
.jpg)


No comments:
Post a Comment