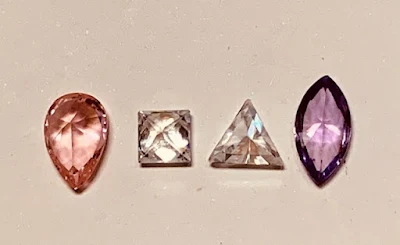
What do all of these stones have in common? One answer, "THEY ALL HAVE POINTED CORNERS!"
I'm using photographs from my inventory of 'past essays' in showing how a square stone is prepared for the setting. In this square, stone-setting, it's the very same technique as for the other various "Vee" shaped claws.
I will explain in this essay, just how similar this process is with "Triangular" shaped stones. The only difference is with three-claws, I'm dealing now with four claws in this setting!
You can see that these 'vee-shaped' claws still need a few light touches with your Triangular file with a #2 grit.
This setting now has a very nice clean finish! The claws are not appearing to be too thick or 'heavy'. I also attempt to Bright-Cut the two sides inside of the "VEE".
Let's now get started in this interesting multi-use 'VEE'-shaped claw configuration!
The very first thing you must do is to literally drill out the corners of the claws with a round bur that is larger than the Girdle of the stone.
The point of the stone must not touch any metal, anywhere, at any time!!!
In this style of setting, you can see where the point is resting. It is sitting in the centre of the "Lucida" style of setting, if it isn't, then fix it NOW! But be careful that the claws are not damaged!
Here are the corners of the stones that we will be working with. You can see just how thick the Girdle of the stone is.
Remember that the round bur that you just selected, must be wider than the widest Girdle facet anywhere on the stone. Do you agree with me?
Please check everywhere on the stone that you need to set! There must not be any fractures or breakage on the Girdle or even the corners, or you will be blamed for the breakage!
This happened to me, and I totally refused to even 'touch the ring or the stone' until the client was made aware of this major problem.
No one saw the 'hidden problem', the stone was 'chipped' underneath the Pavillion that was resting against the claw of the old mount. If I just 'lightly touched' the claw to remove it, I would be then held financially responsible! WHEW!
If your 'gut feeling' says stop! Then do so, examine the stone carefully with your 10x power loup or your 40x power Gem-Scope!
This particular layout is so similar to a Triangular, Marquise, Pear, Princess-shaped stone setting!
For your information, this 'claw-finish' is just mediocre at best.:>( There is no faceting on the outside edges of the claws! Every claw looks misshapen!
This ring top now looks 'acceptable'!
For every 'vee' claw, the corners must be made clean and ready for the next important step in setting!
Use your bud-shaped bur as you did on the previous Princess setting. This process is still the same for all four 'Fancy-Cut' stones.
You must now 'chamfer' the inner gallery, just remove any sharp corners. As your stone might be touching this metal.
Just remove this metal from one 'VEE' claw setting to the other.
You might say that this essay is very similar to "Princess, stone setting", you are right! But the similarity continues further, all of the 'pointed-corner stones' do have the same features and must be considered as 'one of the same'.
Here are some roughly-drawn diagrams that I made for the Princess stone. These techniques are transferrable to ANY POINTED STONE!
I hope that you can see the many detailed cuts by your burs, as shown in the above diagrams!
The claws have now being brought together, but much more work needs to be done on them!
The 'left-top-claw' hasn't yet been moved. Remember that the space in between all of the claws must be uniform in distance. You need a "professional attitude" in setting these delicate stones!
Here is the final great looking finished setting. You can see that I 'attempted' to Bright-Cut inside
the little amount of allotted space given to me.:>( I used a Flat graver #40.
Remember, that we're dealing with only a few millimetres of space. Even I, (sometimes) have difficulty at this stage of preparation.
As a follow-up, the ring is now ready to accept the stone shape of your choice!
Again, the "VEE" shaped claws can be used with any of the 'originally' mentioned shapes.
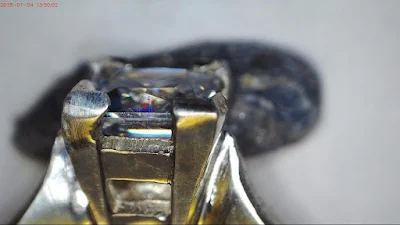
In this photograph, you can see how far apart the four claws are. I will do this on the Triangular as well as the Princess stone, I need and want full access for my burs to get to the claws.


Thanks for sharing the best and informative article.
ReplyDeleteFine Jewellery Collection for Women
Very interesting post. I look forward to seeing something related to this topic and this fantastic post end my search in a very impressive way.
ReplyDeleteArgyle Diamond Investments
Vary informative blog. the information is vary useful.
ReplyDeleteBest Jewellery Shop in Bangalore | Best Jewellery Shops in Rajajinagar in Bangalore
Very great post.Thanks for sharing this post.
ReplyDeleteBuy Best Gemstone Online
Natural Gemstones Shop In India
Buy lab certified natural all mukhi rudraksha online
Birthstone online shopping in india
Buy Blue Sapphire Neelam Stone Online Shop for birthstones online in India and find the perfect gemstone for your birth month. Find the ideal birthstone for you or a loved one with our online shopping website in India.
Loose lab created sapphire stones are an excellent choice for those looking to create custom jewelry that combines beauty, ethics, and affordability. These stones are crafted in controlled environments, ensuring a flawless and vibrant gemstone every time. Unlike natural sapphires, lab-created versions offer a more eco-friendly and conflict-free alternative without compromising on quality or brilliance.
ReplyDeleteGemstone Shop in Bangalore
ReplyDeleteAmazing blog
Loose lab created sapphire stones are an excellent choice for those looking to create custom jewelry that combines beauty, ethics, and affordability. These stones are crafted in controlled environments, ensuring a flawless and vibrant gemstone every time. Unlike natural sapphires, lab-created versions offer a more eco-friendly and conflict-free alternative without compromising on quality or brilliance.
ReplyDelete"This was such a well-structured and beautifully written blog! You made the topic so easy to understand. Keep up the great work—I’ll be following your posts closely!"
ReplyDeleteAmethyst Stone
Thanks for sharing these ideas about using marble in interior design.
ReplyDeletenatural stone Romania
natural stone supplier Romania
natural stone cladding Romania
natural stone flooring Romania
natural stone facade Romania
interior natural stone design Romania
exterior natural stone Romania
custom natural stone projects Romania
natural stone contractor Romania
luxury natural stone Romania
Thank you very much for sharing such a useful article. Will definitely saved and revisit your site chrysoprase
ReplyDelete