This essay is about having a plain wedding band and then setting stones with no beads to hold them in. You are basically making your own Channel set ring.
Suppose you have a clients old wedding band that is a half-round, or as it's now called a "Semi-Round". This client want's you to set 5 or 7 stones in this 'sentimental band'. No claws setting are wanted, but she wants them set inside the band!
The scenario is that you have little time to waste by giving it to someone else to set for you. "Time lost and additional labour o setting fees" all of this is a factor in wanting to do this yourself. This is quite easy to master!!
I rate this project at an easy "6.5 out of 10, on the Difficulty Rating".
What you see here is a Channel Setting, with the 'groove' already built-in.
This makes your job too easy and not much of a challenge! What I have is a simple and a plain wedding band with nothing else to guide you further, pity!

I have put a ring a little dab of oil to allow the stones to adhere to the surface. I'd move the stones around until you have the correct spacing, and of course picking the right size of stones. Once the stones are 'sitting' correctly, I would just mark the surface and note just where the drilling will commence.

Using a round but to make a little indentation for the next step. The actual "Twist drilling" the surface is done now! I use a 1.00mm size drill and use 'loads' of oil to be used for lubrication, while the drilling is taking place.

I'm using a 1.15mm twist-drill to make a preparation for the holes.


There will be many times when you are drilling the holes, you will find that the 'finished' drilled holes are not placed evenly.
To overcome this I suggest that you do the following, get a slightly larger bud bur and start your 'adjusting of the hole' to accommodate the stone.
Rotate the bur on one side of the hole, as this is called 'moving the hole'. If this isn't done NOW, you will have a 'space' in between the two set stones. Not nice to see, trust me..this will be visible after the stone-setting is finally finished.


The next step is to 'counter-sink' the holes you just drilled underneath to make the inside of the ring smooth and not having any rough spots. This little process cleans and makes the holes uniform & round!

In selecting a bud-shaped bur to make a groove in between the drilled holes!

Using a 'slow speed' of the flex-shaft, the bud-bur teeth are literally carving out a recess prior for setting the stones.

Repeat the carving until the bud bur is now actually 'resting' below the surface.
Why is this so important? The recess must be deep enough as to when the
stones are set, this groove will allow the stone to be almost 'floating' in the new channel.

At this juncture, all 'groove polishing' must now commence. If you wish to go to the cloth-wheel polishing, then do so!
I prefer to use my pumice wheels of #180 grit and followed by the #1,000 grit, to assist me further. The grooved-recess MUST be absolutely clean & highly polished. If you decide to do this after your setting, you can't and it's too late!

If you have 5 stones, I'm very sure they all will not be the same size. Sometimes the drilling of the holes might not allow for subtle size differences after the setting starts! It is so very embarrassing to see (spaces) as this can happen..:>(
If you do find one of your stones to be larger, I'd place this in the center of the setting, or you should change that one stone.


When you are making a 'bearing', I would use a bud-bur to assist you in making a bearing-cut. If you are using a '156C, under-cutting' bur, you might have a slanted cut, as you are not really seeing just where the bur teeth are cutting.

I would immediately change from the 156C (bearing cutter) and choose the bud-bur that is almost the same diameter of your stone that has the widest Girdle.


This one step will allow you to make your setting so much easier. I hate to be messing around cutting and again more cutting, time wasting. The result action is that you might just ruin the ring...yuk!

The stone is almost ready to be prepared for setting making sure that the "Culet" of the stone is in the center of the hole.

The stone is now in the channel opening, I used a 'Brass-pusher' to secure the stone. Plus making darn sure that the "Table" of the stone shows you that the stone is sitting flat, and not slanted or crooked.

These stones are not close in being 'Diamond Shaped' with multiple facets. These stones being shown here are having a very high percentage of a high Crown, giving you the need to lower the stone further into the metal, if you can.

This photograph showing you that there are three sizes of stones..from 2.86mm all the way down to 2.65mm's. All of them were bought @ 2.75mm's!

As you can see is that there is a little 'gap' or space in between..whoops!


No matter how low I placed the stone into the metal, the 'Table' will be still sitting too high, just a poor quality cutting from the manufacturer.

This (right side) stone should not have been bought or even used in this project. Just examine the right side stone as compared with the left stone.
OUCH!

This stone-gap is not acceptable by any standards!!! Either you get rid of it, or have it just broken out and then re-drill the bearing & reset the stones further together.


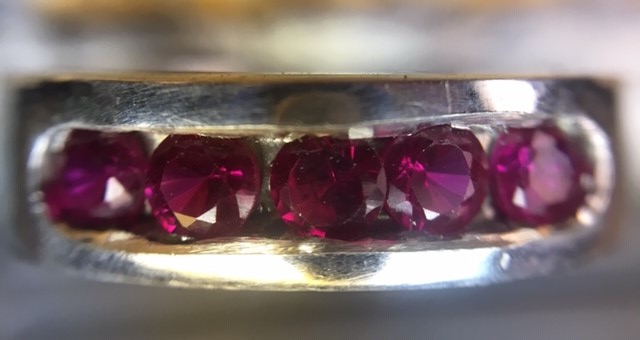
I'm showing another ring but with 'better created' Rubies. This alone makes the setting so much easier, for the setter.
Once you get the stones well set and secured. The time now is to finish off the hammering or metal pushing, but now it's with an Emery wheel of "Medium grit" of paper


All of this now is to have your (Pink) Pumice wheel of #1,000 grit follow up after the #180 grit cleaning. This action is akin to what the polishing wheel can do for you. Doing the finishing this way, you can avoid the rough-polishing by the use of a cloth wheel. You are more conscious of the stones, metal edges, stone configuration, agree?

What happened? What are these points, these are the "Culets" showing from underneath the ring? When you are attempting to start your cleaning, you will easily grind off the "Culets" with no problem, then the stone is totally ruined!


Many times in my office, I did refuse to set a ring as I didn't want any unforeseen problems in size of the ring or the multitude of wrong sizes of stones.
My moral of this; "I didn't want any further headaches upon agreeing to set a problem item!"

In this great photograph, you can see two distinct problems! One Ruby is overlapping it's 'neighbour' beside it, on the other side is a space. That one Ruby is the cause of these 2 errors, while not correcting prior to stone setting. YUK!

For esthetics, stay with the 2.0 mm size of stones. It's not the stone size, but many other factors come into play here, small areas for filing, hammering and even cleaning.

I tightened with my Brass-pusher BUT used my "Reciprocating Hammer" instead. This ring is smaller and I had my doubts if I could secure & hand tighten in a 'reduced setting area'.
At both 'ends' of the 5, stone-layout, I used my 156C Carbide bur to cut a 'bearing, or a groove' just where the stone will be sitting. If failing this, you can use your #006 round bur.

In these photo's, I was using my hammer to gently, and at a very slow speed make light contact with the metal. The "Anvil" of the hammer must never get too close to the edge, lest the 'anvil' hits a stone.
The "How to use a Reciprocating Hammer" on channel settings will be discussed in another essay (very soon)! Knowing this process will make your setting loads easier, but this is definitely a 'learned' skill, I know that!

In using a hammer, you are basically 'moving the metal over the stone'!!!
I dark-painted the surface of the ring, as I wanted to know exactly just where the 'anvil' is touching. It is so time-consuming if you break a stone at this point of setting; PLUS the chances of ruining the ring in that repair, are pretty good!

On white metal and stones, the all 'bright colouring' will hinder you from seeing exactly what's going on! I then painted the metal to show how the 'light pressure' that the hammer is hitting. The anvil is only pushing the metal towards the edge then the metal will make contact, not you!!!
Here are both of the rings, YES, I did measure the stones in both rings. The largest stones are at 2.65mm's, the smallest stones are at 2.0 mm's.


I'm wishing that you are now able to create a Channel Setting from a basic semi-round ring. You can contact me anytime: "gerrylewy18(at)gmail.com".
No comments:
Post a Comment