Sunday, 8 June 2025

How to clean your "Hammer Face"? => 18 photos

 We all have hammers in our possession, but how do you clean them? This particular hammer has decades of history and has seen many projects.


This 'family hammer' was used by my father prior to 1968, of 57 years ago. 
 
 Here is the face of this well used steel face. I haven't put it to any use as it weighs in excess of 350 grams including the handle.

 The correct name of this hammer is "Ball Peen", you can figure out where these words come from 😇

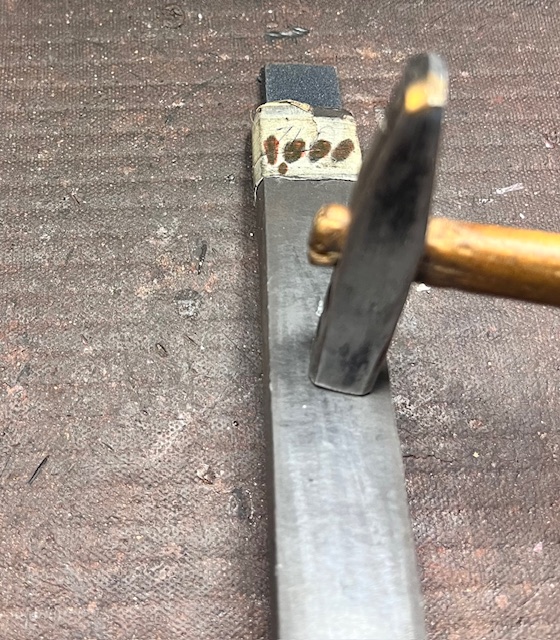
 For comparison, here is my hammer that I use for gemstone setting. 
 
 In using different polishing papers, I start with a #600 grit and rub it gently along the wooden board.

 The 'face' of the hammer is kept totally flat at all times. I make sure that the face of the hammer is kept horizontal and not leaning towards the edges. This is so very important in resurfacing the 'Face'.

 The next softer polishing paper is the #800 grit.

 Once these "Medium Grade" of papers have been worked on, the next step in polishing is to use the finer grit, namely #1,000 grit.

 Finely the last polishing paper in my inventory is the #1,200 grit. We won't be metal carving, but when the metal is being hammered that must be no deep indentations remaining on the surface of the bezel.

 My hammer weight is calibrated at 84.7 grams. This hammering tool MUST BE KEPT IN PRISTINE CONDITION at all times. If there is possibility of indentations due to constant hammering, GET RID OF THEM IMMEDIATELY. 

 I used a "Snap-On, Emery Paper" to initiate the metal grinding, but the steel markings were too deep.

 I'm showing just how deep the steel markings are on this steel face. 

 I wanted to use an Emery wheel, but it came with little success, pity! 

  With this Emery wheel, I had to endure sharp pieces of steel hitting my glasses,

 For a comparison photo, half of the steel face was left untouched. I didn't want to use a grinding wheel as this would be a major cleaning process for the very heavy hammer.

 I use a Drafting Pencil to have the Graphite Pores be imbedded into the polishing paper. In essence, the paper of #1,200 grit would be transferred into #1,800 grit without buying extra sheets of paper.

 The steel face MUST BE KEPT (virtually) FLAT at all times on the polishing paper. This will give you the exact finishing that is required.

Thursday, 5 June 2025

Do you use (thin) claw settings for a 1 carat diamond? =>14 photos


 Some jewellers will offer their clients a thin 4-claw setting instead of a 6-claw setting for a 1-carat diamond.
 My objective in making a ring is always in 'security'. If claws are gently pushed aside or become loose in a 4-claw setting, thousands of dollars can be quickly LOST!

 The best and most basic style with 'absolute 100% security' in a 4-claw shape is shown here.

 For those clients who wish a 'bit of flair', here is an 8-claw setting with Triangular diamonds.  

 My number one choice is a sturdy 6-claw setting that will easily accommodate a 1/2 carat diamond. 

 This particular ring will accommodate a diamond of 1 carat in size. The 4 claws should always be vertical, but never slanted. The Culet Facet of every gemstone should be in the centre of the head.

 I'm using an "Inside, ring clamp" that will allow me to trim all of the claws without damaging them in the process.
  If you wish to set 3 diamonds (or coloured gemstones) on each side in a Flush stone configuration, you have that extra option.


        THESE PHOTOS SHOW THE VARIETY OF HEADS.

 This STRONG 4-claw head will hold any size of diamond without any 'security' problems. Some of the claw settings that are shown here are stamped, but not cast. 

 (REMEMBER TO POLISH THE CLAW SETTINGS BEFORE ANY GEMSTONE IS TO BE SET.)


 'Double-claws' are one of the best in dealing with security and long-lasting beauty.

 These thick claws literally hold the diamond or expensive gemstone without any adverse problems. I'd use these strong claws with no second thought. 

 This style of claw-setting is named "Tulip" as it appears to look like a flower arrangement. The 'tips of the flower' are actually claws in disguise without the usual 4-claw configuration.
  
 The 'basket' is basically a wonderful-looking design that gives the wearer much pleasure.
 These 4 claws blend with the 'Crown Facets'. Although these claws are wide, but are so very strong. The curved tips are 'rounded' for a purpose, as they seem almost invisible from the top.

  As this is a yellow creation, this 'basket' looks like a flower.
 This final choice of a setting is for a diamond of a 3/4 carat size, but refrain from anything larger. The reason is that the diamond might appear to be 'top-heavy' to the thin-looking shank.


These remarks are mine and not of any jewellery manufacturer.

Saturday, 31 May 2025

Techniques of "Flush Setting" a gemstone? => 7 photos with diagrams

The variety of designs is almost endless. Some of these pictures of rings were obtained through Google.
If you can't read the above two pages, I suggest increasing the size of the font.
====================
 Here is my original drawing that I hand-drew many years ago. (I found it on the internet just now.)
1) The 'Table' of the stone must never exceed the surface of the metal.
2) The High Speed Steel burs are too aggressive to cut grooves.
3) The Carbide bur teeth are much closer together and are more 'gentle' to create seats for the stone.
4) NEVER LET THE 'CULET' (pointed section) PROTRUDE below the bottom of the ring. If you do, then your customer will actually feel the diamond cut into the skin. OOPS!


 1) After the stone has been set into the metal, remember to 'Bright Cut' the metal around the stone. This photo is the 'epitome of gemsetting perfection'.

2) This "Bright-Cutting" technique can be made with an Onglette graver that has been highly polished on the cutting side.

 3) Please do not use a 'Flat-shaped graver' as the blade might touch the Facets and leave a 'rippling edge' around the bezel.

4) I would personally use Pumice wheels and gently smooth all of the surfaces nearest to the stone. Use #180 grit, then followed by #1,000 grit. Then the ring will be a wonderful thing to behold.

 If you think that setting these many sizes of stones is easy, you are looking at 5 different sizes of gemstones.

 By the way, have the surface of the ring Tripoly-polished before stone setting. If you polish the metal after the stone setting, some of the stones might get loose! All that is needed is to 'gently' Rouge the surface.


 If you have aspirations of attempting to set these gemstones, think twice. Why? Those odd-shaped stones could be a real nightmare to the jeweller or novice setter.

 First, create the ring with the aid of CAD and use the computer-aided design program to guide you. There are many sizes & shapes of baguettes to contend with.

 Around each of these stones were a 'Bright-Cut' to visually finish the gemstone setting.

 If you need a library of 'additionally' selected Gypsy or Flush mounted stones just click on to "FLUSH SETTING".

 Instead of a ream of words for you to absorb, the above diagram is just for you. "Enjoy, read and learn." - Gerry Lewy.


Wednesday, 28 May 2025

What is a "Bead Raiser" & how does it work? => 6 photos


 This is what every Bead Raiser tool looks like under 100x power magnification. You will notice that the front of the graver point has been radically changed & reshaped. THIS IS VERY IMPORTANT.
 If you avoid this curved front, the 'beading tool' will just cut through the metal as if you were engraving. Which you aren't.

 If the graver was sharp and pointed, there would not be any opportunity to create a Bead for Pave purposes. This curved front acts like a spade as it pushes metal over the Girdle of the stone.
 If you decide to 'push' more metal over the Girdle, something will indeed happen. That little piece of bead metal will definitely break off!!!
 You have only one chance of making a Pave' bead.

 How do you know that the new Bead is going to hold the stone? This is done by seeing that 3-4 sections, or corners of the gemstone, will be covered by metal.


 Even in a reduced space, as seen here, even these new beads create a 'controlled pattern' or design.

  I prefer not to use a wide Onglette graver as seen in the lower example. For creating the correct shape (continually) of a bead, the best size of graver is the narrow blade.
 DON'T HAVE A 'HUGE MOUNTAIN OF METAL' COVERING THE SMALL STONE, when all you need is a thin blade. I strongly urge you to select a #2 Onglette width of a graver.


  If the new 'Bead Raiser' was shaped using a wide #4 Onglette, how could the setter create little 'beads'? Here is the proof of what I'm trying to show you. SIZE DOES COUNT!


Tuesday, 27 May 2025

(REVISED) "Casting with Gem Stones" =>12 photos & 8 text pages.

  This tutorial essay was published on this blog six years ago. I'm adding new text to each page for easier reading. This is one of the most interesting 8 pages any jeweller or caster can have in their library.

 This company has been in business since 1988. The owner, John Eisinger (R.I.P.), was the original owner of this company.

============================

 These days, 'CASTING WITH GEMSTONES' is no longer a myth, but an actual reality; it is now a working practice.

 On "Ganoksin", I often see instances where new jewellers need some helpful techniques to get started with their casting.


The wax pendant is now ready for casting. You can now see where the connection is, it is UNDER the pendant, not against the frame.

 By the way, the 'shrinkage factor' between the wax to the finished piece of jewellery is 6%. Always remember this number.

 I inked where the claws were 'untouched', the remainder of them are missing. If you want to fix then in metal, do so, but not in the wax form, if you do, more claws will break off.

 When you find that some of the claws are missing when you take the wax out of the rubber mold. Redo the injected wax AGAIN!!!


It is advisable to set this pendant AFTER the casting has been done. Your handling of the wax could damage the wax pattern.

These stones are too small, don't even consider using them.

 Even I would prefer to set these stones in the metal and forgo the idea of 'wax setting'.

 In this photo, I was initiating "Bright-Cutting", this technique cannot be done in the wax.

These stones are ready for insertion into the new wax form.

The warm (not hot) wax pen is gently preparing the stone, then the stone will be positioned into the wax.


 These quoted prices have drastically changed since the printing in 2006. Many manufacturers have their own labour prices.

 You have the option to make minor adjustments to the temperatures as needed.
  DON'T QUENCH YOUR HOT CRUCIBLE INTO COLD WATER, ONLY 'AIR COOL'.....please!
DO NOT 'CAST WITH GEMSTONES' IF THE "MOHS SCALE OF HARDNESS" IS BELOW SIX. A Genuine diamond is rated as 10.
View the list of delicate stones that shouldn't be used.
 I've inserted a photo of a 'Synthetic Emerald' showing what happens when a soft stone is used. Here is a white stone that was not prepared for 'stone setting' in wax.


 In this photo, 'was' a decent-looking stone, but the jeweller or operator made an error and placed his green stone into his wax. Here are his unfortunate results! Both the stone and the ring are now no longer usable. Sad to see this!